Chunky Stacked Ring
Posted by Laser Tech on
We're back with another cool project just in time for summer. If you've thought about designing accessories then we've got a super easy project for you. All you need is to measure your ring finger and take some addition measurements so that your chunky ring isn't too...chunky. Here's your intro to laser cut jewelry design.
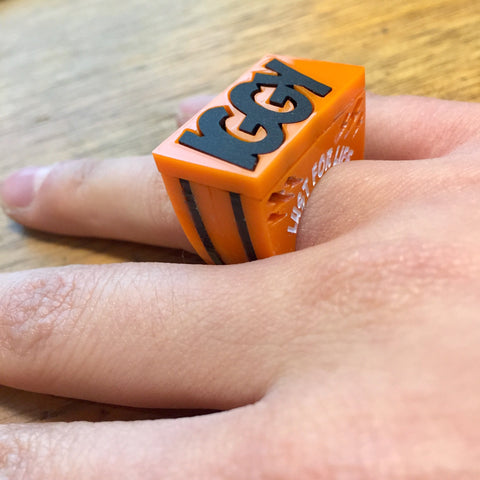
I wanted to make an Iggy Pop (yeah, NOT Azalea) acrylic ring to contrast with a similar shaped lost wax cast version of a Bowie ring that I own. To make your own chunky stacked ring you will need to take measurements based on your finger size.
MEASUREMENTS
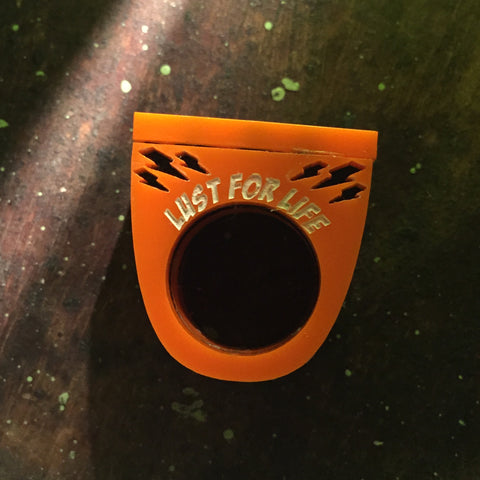
We will start with the face plate. You don't even have to design a face plate if you don't want to. This stacked ring still looks impressive without the 'IGGY' front plate. Just in case you're curious about making a front plate, I measured the Bowie ring and found that the face plate is 25.38 mm wide by 14.70 mm tall.
Next, you will need to measure your ring finger. The easiest way to get this measurement is the cut a strip of paper and wrap it around your ring finger. Mark the end point. Then with a ruler, measure the beginning of the strip to the end of the point that you just marked.
FILE LAYOUT + SETUP
Our laser is 24" x 36". Open a new file with a 24" x 36" sized board in your vector editor. You will need to adhere to the Outfab.com guidelines while setting up your file. I used RGB blue (0,0,255) hairline (.25pt) and RGB black (0,0,0) .5pt for the entire file. We recommend creating a laser cutting color palette for ease.
Make sure that you setup guides with a .2" margin around the entire file. You do not want any vectors outside of those guidelines. Anything outside of the margin will be cutoff by the laser.
DESIGN
To design the base of the ring, you will need four 1/8" (3.175 mm) acrylic ring segments and two 1/16" (1.5875 mm) acrylic ring segments. The two 1/16" pieces are necessary to act as spacers to fill up the width of the face plate. You could also just reduce the size of the face plate to fit just the four 1/8" acrylic ring segments.
To create the text, chose a legible font and adjust the kerning to diminish all gaps between letters. You will need to create a contour around the newly kerned text to connect all the letters. You can find tips on contouring text (or bulking up text) for laser cutting on our Dos and Don'ts page. Remember to fillet the text so that there are only rounded corners and no sharp angles. Sharp angles will stress the material. Over time the material will crack and eventually break at that point.
The final step is to convert the text to curves so that 'IGGY' is a solid vector that can now be laser cut. You can add additional etching or cutouts on the outer facing ring bases if you like.
Your file should look something like this when you are finished.
MATERIAL
We stock many different colors of acrylic and varieties of wood that would make really unique ring combinations. I used solid neon orange and matte black (not available on the website) for this ring.
FINISHING
Your pieces have arrived! Take them out inspect them. I used white acrylic paint to fill in the etched areas of the front ring parts. As you can see, this makes the text stand out so much more.
You will want to use a strong adhesive to glue the ring segments together. Glue the ring segments together first. Let that set for at least 15 minutes before gluing the face plate onto the ring and the "Iggy" text into to the face plate. 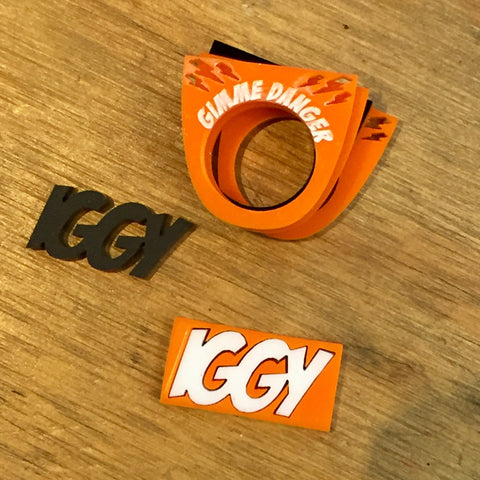
That's it! If you have any questions about this project you can contact us through email, the comments section on this page or the contact page.
Enjoy and have fun with this one!
Share this post
- Tags: accessories, DIY, jewelry, jewelry design, laser cut jewelry, laser cut ring, project, project idea, ring