Translating a Sketch to a Vector to a Mylar Stencil
Posted by Laser Tech on
This tutorial will explain how you can take an original hand drawing and compose an editable vector. We will then take that vector graphic and design a stencil that we will then laser cut from 7.5" mylar.
Simple enough right?
STEP 1: ORIGINAL DRAWING

I wanted to make a stencil for my work apron based on my favorite comic book heroine. Black and white works best for this "vectorizing" process. This sketch is very raw, but once I import the scanned drawing into a vector editor (CorelDRAW, Adobe Illustrator or Inkscape) I can refine the base vector by removing extra nodes and filleting corners.
STEP 2: CREATING A VECTOR FROM A SKETCH
Scan your drawing and import the .jpg in to your vector editor of choice. Once you do that, select your drawing and select "Trace Bitmap." You can select "Quick Trace" for this stencil project since we just want a simple outline of the text. For more detail drawings, I recommend choosing "Outline Trace," Detailed Logo" and adjusting the settings to your liking.
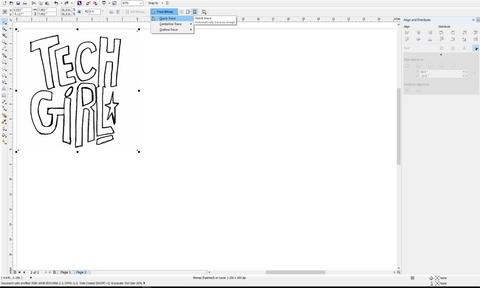
STEP 3: CLEANING UP YOUR VECTORS
After this step, I filleted (rounded) the corners. Filleting the corners suits this particular design, plus this process will add structure to the stencil and prevent wear and tear. I also cleaned up the text by adjusting nodes and removing extra nodes that impede the cutting process. This is a VERY important step. Not only does it cut down on cutting time, but your design will cutout cleanly. If there's an excess of nodes you will notice lines will be wavy.
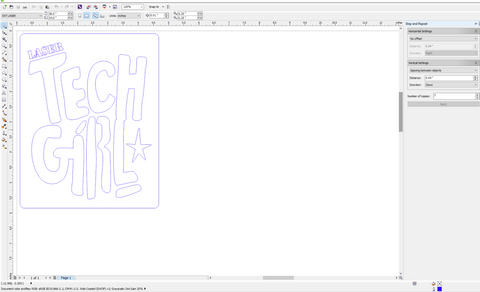
STEP 3: DON'T FORGET TO ADD A BORDER
Pretty simple. People do forget this last, but very important detail and we end up shipping the cutout letters instead of the outer portion (the stencil). You must add a border around your stencil for us to cut. All of our materials, including mylar are raw, uneven materials.
I used a rounded square for this project. You can use any shape that you prefer, just remember to fillet (round) those corners by at least .01". I cannot stress that point enough. Rounded corners!
STEP 4: SUBMIT YOUR DESIGN & PAINT
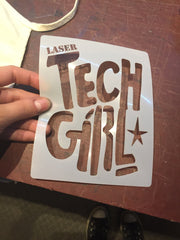
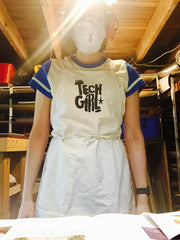
I used the very durable 7.5 mm mylar for this project. I want to use this stencil again for a tote bag or 12 and perhaps a few other things. We also stock 4 mm mylar if you just need your stencil for one time use.
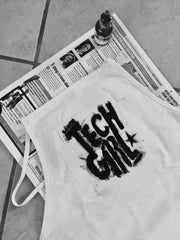
I used a standard fabric paint that I picked up from Michael's Arts & Crafts and chose a child's standard apron. Make sure you pre-wash the cloth/canvas item before you paint.
Have fun with this one! Let us know if you have any questions about this project in the comments below.
Simple enough right?
STEP 1: ORIGINAL DRAWING

I wanted to make a stencil for my work apron based on my favorite comic book heroine. Black and white works best for this "vectorizing" process. This sketch is very raw, but once I import the scanned drawing into a vector editor (CorelDRAW, Adobe Illustrator or Inkscape) I can refine the base vector by removing extra nodes and filleting corners.
STEP 2: CREATING A VECTOR FROM A SKETCH
Scan your drawing and import the .jpg in to your vector editor of choice. Once you do that, select your drawing and select "Trace Bitmap." You can select "Quick Trace" for this stencil project since we just want a simple outline of the text. For more detail drawings, I recommend choosing "Outline Trace," Detailed Logo" and adjusting the settings to your liking.

STEP 3: CLEANING UP YOUR VECTORS
After this step, I filleted (rounded) the corners. Filleting the corners suits this particular design, plus this process will add structure to the stencil and prevent wear and tear. I also cleaned up the text by adjusting nodes and removing extra nodes that impede the cutting process. This is a VERY important step. Not only does it cut down on cutting time, but your design will cutout cleanly. If there's an excess of nodes you will notice lines will be wavy.

STEP 3: DON'T FORGET TO ADD A BORDER
Pretty simple. People do forget this last, but very important detail and we end up shipping the cutout letters instead of the outer portion (the stencil). You must add a border around your stencil for us to cut. All of our materials, including mylar are raw, uneven materials.
I used a rounded square for this project. You can use any shape that you prefer, just remember to fillet (round) those corners by at least .01". I cannot stress that point enough. Rounded corners!
STEP 4: SUBMIT YOUR DESIGN & PAINT


I used the very durable 7.5 mm mylar for this project. I want to use this stencil again for a tote bag or 12 and perhaps a few other things. We also stock 4 mm mylar if you just need your stencil for one time use.
I used a standard fabric paint that I picked up from Michael's Arts & Crafts and chose a child's standard apron. Make sure you pre-wash the cloth/canvas item before you paint.
Have fun with this one! Let us know if you have any questions about this project in the comments below.